Sunday, November 7, 2010

Hogwart feast!


Blood Pop, rock cake, Pumpkin pie, Butterbeer, Every flavour bean and chocolate frog.


Chocolate frog (pattern coming soon!)


Every flavour beans


Sorry it's been a while that I posted. Truth is, with my newborn and toddler, I found little time making felt food. But that should improve now that the holidays are coming, I want to put some more stuff in my daughter's fridge.

This little set was part of a swap gift, and will take also part in my other blog's 5 days of HP craft, where I'll share the patterns for these.


Tuesday, July 6, 2010

Milk Bottle


The diaper bag (and its contant) can be found here, on my other blog :)

And here's a rough guide of how I cut my pieces...

Makes sure your body is the circumference of your bottom piece and adjust your nipple part to fit.

Tuesday, June 1, 2010

Heart Shaped Sugar cookie


You can find the listing for them here :)

Monday, May 31, 2010

Very chocolate CD cake


... I call CD cake those that I take a cd as a template for the wight.


...Etsy Listing for this cake here! :D

A batch of Sunny side ups


They need some bacon friends...

Chocolate Cookies


Here are the newest cookies I made, Chocolate with color sprinkles!


And I took a nice pic of those all-chocolate ones


Etsy listing is up for both Triple Chocolate & Sparkles Cookies! :D

Monday, May 3, 2010

Cookies..Triple Chocolate and sugar :)


I've made 10 triple chocolate cookies today! They are the beginning of a huge batch I'm making for a fair that's gonna happen next fall.


I also made a sugar one with icing sparkles are made with a French knot, so much more toddler-friendly than beads!

Sunday, May 2, 2010

Ice cream Cone!


Spring arrived. Ice cream parlor are finally open here!
I made the cone and the vanilla ice cream ball ages ago, but did the last two just yesterday.


Those are really easy to do: Take something round..A CD will do. It will seem big but when you'll gather it it'll make a small ball. Once gathered, fill and cut a smaller circle fitting the hole you have and stitch it in place. Than you can put a piece of velcro and the base and one at the top if you'd like your ice cream to pile on.

For the cone, cut a triangle with a round end (think of a pizza slice) the wight and length you'd like you cone to be. To "waffle" it, I've stitched in parallel lines, making diamonds, with my machine. You can go fancy and pin-tuck it (than cut a larger triangle you want your cone to be)
See the edges, fill, and cut a circle accordingly to your opening. Sew or stick on velcro..your done! :D

Monday, March 29, 2010

Ice cream sandwich... And how I did it!


First I've cut two brown felt rectangles with my fancy scissors and a large and long white rectangle.


I've pinned my white rectangle to my brown one starting in the middle of a shortest side. I gathered the corners like that:


I've run it trough my sewing machine and cut the excess of white, I've flipped it and pinned the white fabric together.


Then I realized I couldn't do the other side with my machine... So I've pinned it and handstiched the two longer side


Gathered the white fabric at the corners and sewn


Then I've flip it right side and sewn the other two corners and I've stuffed (with cut-outs)


I've kind of ladder stitched to close


Then I've made the six knot, here's what I did:
1-I've made a knot, pass my needle straight throught and made another knot, holding thight.
2- I've French knot at the "top" (c.i: the machine stitched side)
3-I've repeated for the 5 other knots.


Lastly, I took a white thread and close the white fabric together.


There you have a yummy ice cream sandwich...
And I made that while it was snowing...


now I'm craving for ice cream...

Sunday, March 21, 2010

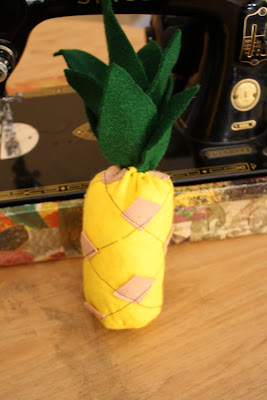
Pineapple & slices


I should have sewn more lines and closer... Next time I'll know it.


I'm pretty happy with those. They only need a piece of ham now!

Thursday, March 18, 2010

Sushi


I did a 10 pieces sushi set for
my daugther. Now i don't know much about the names so correct me if I'm wrong... but here it goes (I think)

Ebi Sushi (prawn), Maguro Sushi(tuna), Sake Sushi (salmon), Tamago Sushi (egg).
There's also 6 maki (rolls) which I don't know their proper name. The two littles are avocado (my favorite) the square one is salmon with avocado and fries. The one w
ith red in it is a fruit one (strawberry, orange, avocado). the other one as shrimp and the last one with the beads is caviar (my daugther's favorite... I had to take it out!). I also added some wasabi and a ginger rose.


close-up

I decided doing filled plush ones instead of felt-rolled ones... but that just personal taste.

Friday, March 5, 2010

My two other blogs will only be one


Hi Everybody!
I've decided that keeping two other blog was too hectic and mixed Maman Tattoo with Pagan Side. Or course, Playing with your food will remain the same with all the felt food goodies :)
So in Aux Demilunes, I'm still gonna post about all the crafts I'm doing (sewing, furniture makeover, art...) and I'm gonna add pagan lifestyle insight. I've sorted everything in a menu bar for easier blog browsing :)

Come take a look and become a follower!

I won't update Maman Tattoo or Pagan Side anymore, thanks for all those who followed!

I'm presently working on a 10 pieces sushi kit.. Can't wait to show you!

Thursday, March 4, 2010

Making a play toaster; a journey!


First, I've taken an empty box that was a right size for a toaster.


I took some measurements (they were too tight, btw)


I cut my sides and bottom and top


I've cut the tops and put them away


I've taken the top and marked my holes


I verified if the toast I made was passing through...


I took a left out and marked the inbetweens to strengthen the top


Glued with Modpogde. So far it's the best glue on felt I've found


I started sewing


Then did so fitting and realized it would be too small so I cheated


And it served me good since I took the needed cardboard to divide the toaster


So the toasts don't get lost...


I've pinned the top and got back at sewing


But the uncarboarded side looked weird


So I've put in another rectangle of cardboard to straighten it a bit


Then I marked were my popcycle sticks would go, carefully noting a spot where the toast would be hidden before poping


I've inserted the sticks...


Grilling...


...Poped!


But to give a more finished look I sew 2 little rectangles together


...Gives a much more finished look


I've doubled the pocycle sticks so the toast won't travel as much


Now I'm wanting a toast (must be pregnancy hormones Okay, I'm just a late eater...)


And now it's sitting on my daughter's almost finished Playkitchen!

Now I have some advice for you... forget the box and use cardboard felt!

About Me

My photo
I'm a 23 yr old mommy of two little pixies, sharing my life with my best friend. We live in La Belle Province, French is our first language. In the middle of nursing and caring for a toddler's need, I sew, draw, paint, and take pictures to tell. We also struggle to live an healthy life, apparently surrounded by people that doesn't care much, and we're on budget, too!